Building a Mailchimp Integration for Google Sheets [Free Template]
![Building a Mailchimp Integration for Google Sheets [Free Template]](/content/images/size/w1200/2024/09/mailchimp-google-sheets.png)
Despite lots of new entrants in the email marketing platform space, Mailchimp is still a go-to tool for lots of small businesses and online publishers. One of the reasons we are still big fans of Mailchimp is its extensive API. This makes Mailchimp a great platform to build on top of and extend to fit whatever custom task you might be working on. That is, if you are comfortable with some coding.
If you are not technical, there are a lot of new options that are out there that provide no-code integrations. We have our own no-code connector that syncs all of your Mailchimp data with Google Data Studio, allowing you to build custom reports and dashboards from there.
This guide assumes though that you do have some technical knowledge and are comfortable with a bit of Javascript as well as some knowledge of APIs. If you haven’t ever connected to the Mailchimp API, we recommend that you start with this more basic guide that we recently wrote.
Here are the tools we will be using to build our Mailchimp to Google Sheets integration.
Mailchimp Reporting API
This is the API that Mailchimp offers in order to pull reports for all of the email marketing campaigns you have sent from your Mailchimp account. It includes states like Opens, Clicks, Emails Sent, Bounces and a lot more. For a full list of fields that are available through the Mailchimp Reporting API, you can refer to the Mailchimp API reference.
Google Apps Script
Google Apps Script is the way that you add custom code to Google Sheets and other Google applications. It is basically Javascript, but with some additional built-in functionality for interacting with Google services as well as the application the script is attached to.
Now that we are familiar with the tools we will be using, let’s jump into it. We will be covering the following:
- Mailchimp API Basics
- Using the Mailchimp Reporting API
- Setting up a Google App Script in Google Sheets
- Integrating Mailchimp and Google Sheets
Mailchimp API Basics
We won’t go into too much detail about connecting to the Mailchimp API, as we have already written a guide for that.
In short, you will need to:
- Create a Mailchimp API Key
- Know your Mailchimp Server location
If you already have those ready, then you are ready for the next step. Otherwise, refer to our previous guide showing you step-by-step how to get started.
Using the Mailchimp Reporting API
With our API Key and the Mailchimp server location, we can go ahead and connect to the Mailchimp Reporting API.
First, let’s test it out by using Postman.
If you refer to the Mailchimp API reference, we will see that the reporting API endpoint looks like this:
https://[SERVER-LOCATION].api.mailchimp.com/3.0/reports
So if our Mailchimp server location is ‘us15’, then our API URL will be:
https://us15.api.mailchimp/3.0/reports
Let’s now get into Postman and see if we can get our data flowing. Here’s what our request will look like including all of our API key for authentication:

And then we should get some data that looks like this as our response:
{
  "reports": [
    {
      "id": "string",
      "campaign_title": "string",
      "type": "string",
      "list_id": "string",
      "list_is_active": true,
      "list_name": "string",
      "subject_line": "string",
      "preview_text": "string",
      "emails_sent": 0,
      "abuse_reports": 0,
      "unsubscribed": 0,
      "send_time": "2019-08-24T14:15:22Z",
      "rss_last_send": "2019-08-24T14:15:22Z",
      "bounces": {
        "hard_bounces": 0,
        "soft_bounces": 0,
        "syntax_errors": 0
      },
      "forwards": {
        "forwards_count": 0,
        "forwards_opens": 0
      },
      "opens": {
        "opens_total": 0,
        "unique_opens": 0,
        "open_rate": 0,
        "last_open": "2019-08-24T14:15:22Z"
      },
      "clicks": {
        "clicks_total": 0,
        "unique_clicks": 0,
        "unique_subscriber_clicks": 0,
        "click_rate": 0,
        "last_click": "2019-08-24T14:15:22Z"
      },
      "facebook_likes": {
        "recipient_likes": 0,
        "unique_likes": 0,
        "facebook_likes": 0
      },
      "industry_stats": {
        "type": "string",
        "open_rate": 0,
        "click_rate": 0,
        "bounce_rate": 0,
        "unopen_rate": 0,
        "unsub_rate": 0,
        "abuse_rate": 0
      },
      "list_stats": {
        "sub_rate": 0,
        "unsub_rate": 0,
        "open_rate": 0,
        "click_rate": 0
      },
      "ab_split": {
        "a": {
          "bounces": 0,
          "abuse_reports": 0,
          "unsubs": 0,
          "recipient_clicks": 0,
          "forwards": 0,
          "forwards_opens": 0,
          "opens": 0,
          "last_open": "string",
          "unique_opens": 0
        },
        "b": {
          "bounces": 0,
          "abuse_reports": 0,
          "unsubs": 0,
          "recipient_clicks": 0,
          "forwards": 0,
          "forwards_opens": 0,
          "opens": 0,
          "last_open": "string",
          "unique_opens": 0
        }
      },
      "timewarp": [
        {
          "gmt_offset": 0,
          "opens": 0,
          "last_open": "2019-08-24T14:15:22Z",
          "unique_opens": 0,
          "clicks": 0,
          "last_click": "2019-08-24T14:15:22Z",
          "unique_clicks": 0,
          "bounces": 0
        }
      ],
      "timeseries": [
        {
          "timestamp": "2019-08-24T14:15:22Z",
          "emails_sent": 0,
          "unique_opens": 0,
          "recipients_clicks": 0
        }
      ],
      "share_report": {
        "share_url": "string",
        "share_password": "string"
      },
      "ecommerce": {
        "total_orders": 0,
        "total_spent": 0,
        "total_revenue": 0,
        "currency_code": "USD"
      },
      "delivery_status": {
        "enabled": true,
        "can_cancel": true,
        "status": "delivering",
        "emails_sent": 0,
        "emails_canceled": 0
      }
    }
  ]
}
These are all of the fields that you can access for each of your campaigns using the Mailchimp Reporting API. Notice that some of them are nested, like clicks, for example, while others are not, like campaign_title. This will be important later when we parse our data in Google Sheets.
Setting up a Google Apps Script in Google Sheets
Now that we have the data flowing through from the Mailchimp Reporting API, let’s see how we can get it into Google Sheets.
First, we need to do some basic setup in our Sheet to get it ready for our script. Let’s start by adding a few cells in the top left corner:

Here’s what we did:
- API Key - in cell B1 we put our Mailchimp API Key
- Server Location - in cell B2 we put our Mailchimp server location
- # of Campaigns - in cell B3 we put the number of campaigns we want to pull from the Mailchimp Reporting API. The default is 10 and the maximum is 1000
- Data Fields - finally, in cell B4 we put the data fields that we want to pull from the Mailchimp Reporting API separated by a comma
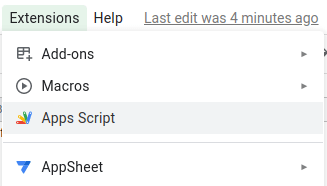
Now that we have that initial setup in our Sheet out of the way, let’s get started with our script. We will start by clicking on Extensions > Apps Script.

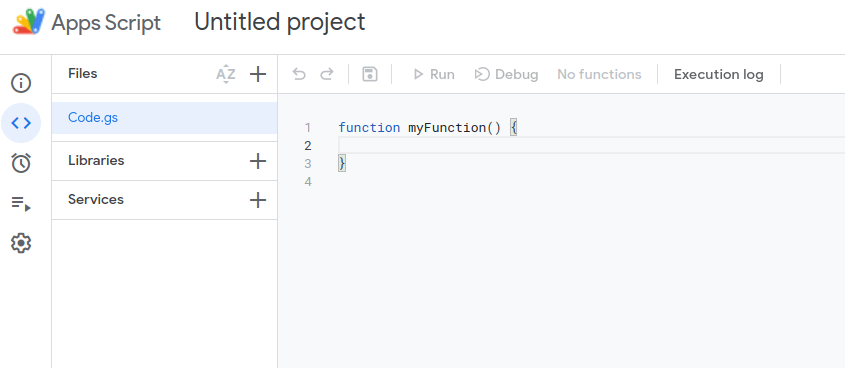
This will then open up a new script that looks like this:

Now we are ready to add our script. To begin with, we will replace the myFunction() function with this:
function Mailchimp () {
  //get current selected sheet tab
  const sheet = SpreadsheetApp.getActiveSheet();
  //get all values in the config rows at the top
  const config = sheet.getRange(1, 2, 4).getValues();

  //reads all config values based on which cell they are in
  const apiKey = config[0][0];
  const dc = config[1][0];
  const numCampaigns = config[2][0];
  const dataFields = config[3][0].split(',');
  const rowDataBegins = 6;
}
We are changing the name of the function to Mailchimp. Then we are getting the selected Google Sheet and then the range of cells at the top that we just added. Specifically, in getRange, we are telling Google Apps Script to select the first row in the second column and do this for 4 rows. The values of these 4 cells will now be stored as an array under the config variable.
If you do a quick console.log(config), you can see how all of the config fields are stored:

Notice that these are arrays of arrays, so in our next step we will need to take that into account. To do this, we just parse the array values into separate variables which will make our life easier later. So our API Key is config[0][0], with the second index value required since it is an array of arrays.
The rest of the values follow the same pattern except for dataFields, which we have to then split based on the commas that separate the values. Finally, we have one additional variable called rowDataBegins, which we’ve added to know which row in our Sheet to start populating our data.
Integrating Mailchimp and Google Sheets
With that initial script configuration out of the way, we can now move on to our actual Mailchimp integration. In our script we will add the following:
//builds API url
 const url = `https://${dc}.api.mailchimp.com/3.0/reports?count${numCampaigns}`;

 //API params including auth with API key
 const params = {
   'method': 'GET',
   'muteHttpExceptions': true,
   'headers': {
     'Authorization': 'apikey ' + apiKey
   }
 };
We are simply building our API URL using the server location (dc) and number of campaigns from our config fields. Then we are adding our API key to the authorization headers of our request.
Next, we will actually make our request to the Mailchimp Reporting API by adding this code:
try {
    //actual API request
    const response = UrlFetchApp.fetch(url, params);
    const data = response.getContentText();
    const parsed = JSON.parse(data);

    //map through each campaign
    parsed.reports.forEach((report, i) => {
      //for each campaign, map through each data field requested
      dataFields.forEach((dataField, j) => {
        //in first row, print the data field requested as a header
        if (i < 1) {
          const headerCell = sheet.getRange(rowDataBegins + i, 1 + j);
          headerCell.setValue(dataField).setFontWeight("bold");
        }
        //if not first row, cell will be populate with response data field for that column
        const currentCell = sheet.getRange(rowDataBegins + i + 1, 1 + j);
        //actually populates the data in the selected cell
        currentCell.setValue(report[dataField]);
      })
    })
  }
  catch (e) {
    console.log('Error:', e);
  }
We are making the actual API call using Google Apps Script’s UrlFetch and then parsing the response. Then we are mapping through each of the campaign reports we receive and then mapping through our data fields to get each data field we want from every campaign.
If we are on the first row, we print out the name of our data fields as headers. Otherwise, we simply populate the cell with the data field from our Mailchimp data.
There is one issue with this code currently that we need to fix. We haven’t taken into account the nesting of the data that we talked about previously. So we will need to make a slight modification changing our code that looks like this:
currentCell.setValue(report[dataField]);
To this:
let cellValue = report[dataField];
//parse nested fields in response from Mailchimp
switch(dataField) {
  case "hard_bounces":
  case "soft_bounces":
  case "syntax_errors":
    cellValue = report.bounces[dataField];
    break;
  case "forwards_count":
  case "forwards_opens":
    cellValue = report.forwards[dataField];
    break;
  case "opens_total":
  case "unique_opens":
  case "open_rate":
  case "last_open":
    cellValue = report.opens[dataField];
    break;
  case "clicks_total":
  case "unique_clicks":
  case "click_rate":
  case "last_click":
    cellValue = report.clicks[dataField];
    break;
  case "recipient_likes":
  case "unique_likes":
  case "facebook_likes":
    cellValue = report.facebook_likes[dataField];
    break;
  default:
    break;
}
//actually populates the data in the selected cell
currentCell.setValue(cellValue);
By default we are assuming that the data field is not nested, however, we are then using a Switch statement to look for specific fields that we know are nested. In the case we are dealing with any of those fields, we specify how that data is nested. So for example, the field opens_total is accessed at report.opens[‘opens_total’].
And with that, we just need to run our script and we will see our Mailchimp integration is working and pulling down campaigns:

Conclusion
In this guide, we looked at how you can build your own simple integration to the Mailchimp Reporting API in Google Sheets.
If this guide went over your head, you can either use the working template here or you can check out our Google Data Studio Connector for Mailchimp that gives you campaigns data as well as lots of other Mailchimp data views directly in Data Studio.


